Building a modal form with Turbo Stream GET requests and custom stream actions
24 Sep 2022Turbo 7.2 brought major changes to what you can accomplish with Turbo Streams. To demonstrate those changes, today we are going to build a Turbo Stream-powered modal form without a single Turbo Frame. We will also create our own custom Turbo Stream action that emits a custom event on the browser.
The key technique we will use in this article is an update to the standard method of using Turbo to open and populate modals. Prior to Turbo 7.2, Turbo would not allow GET requests to respond directly with Turbo Streams. Smart folks devised a workaround to this limitation which involved using empty Turbo Frames to sneak in Turbo Stream actions. That workaround still works fine, but it is no longer necessary.
As part of our modal implementation, we will also have a chance to build a custom Turbo Stream action. Custom actions are an entirely new feature added in Turbo 7.2, and we will cover enough to get you started with this new tool in Turbo.
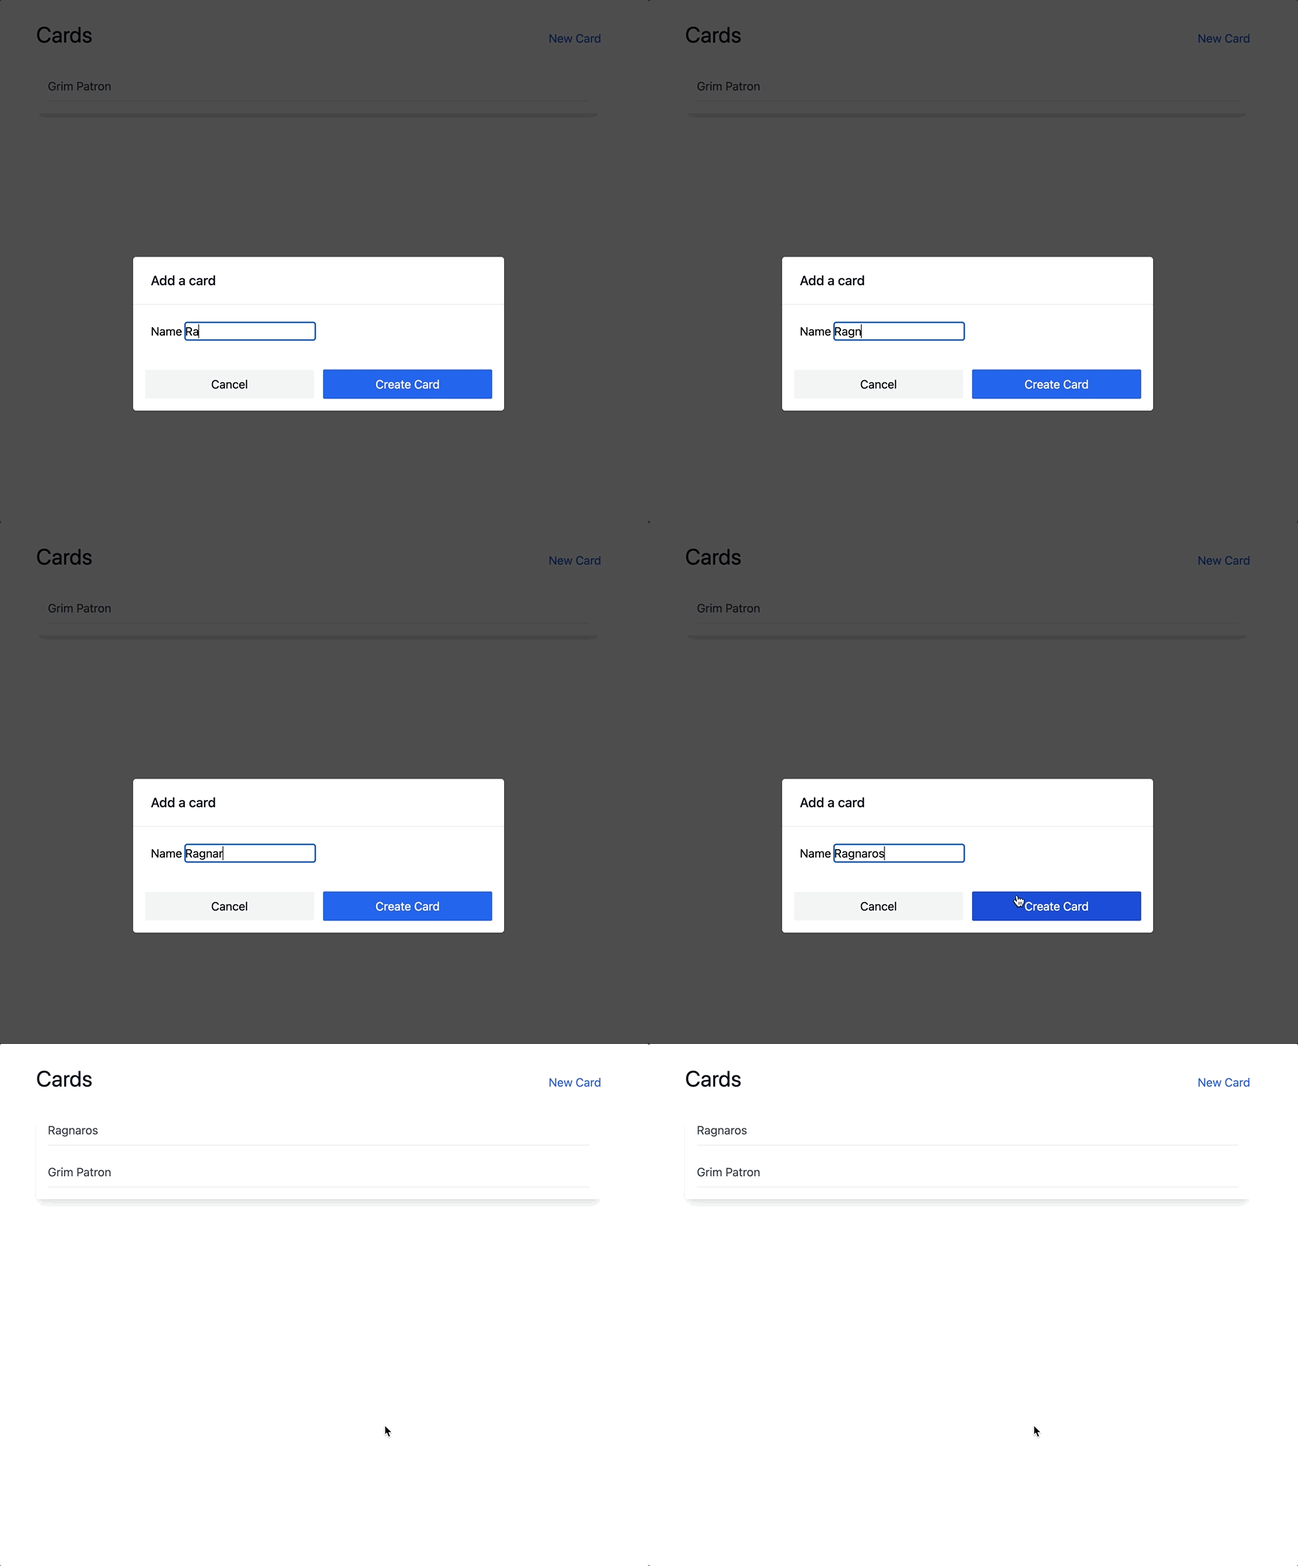
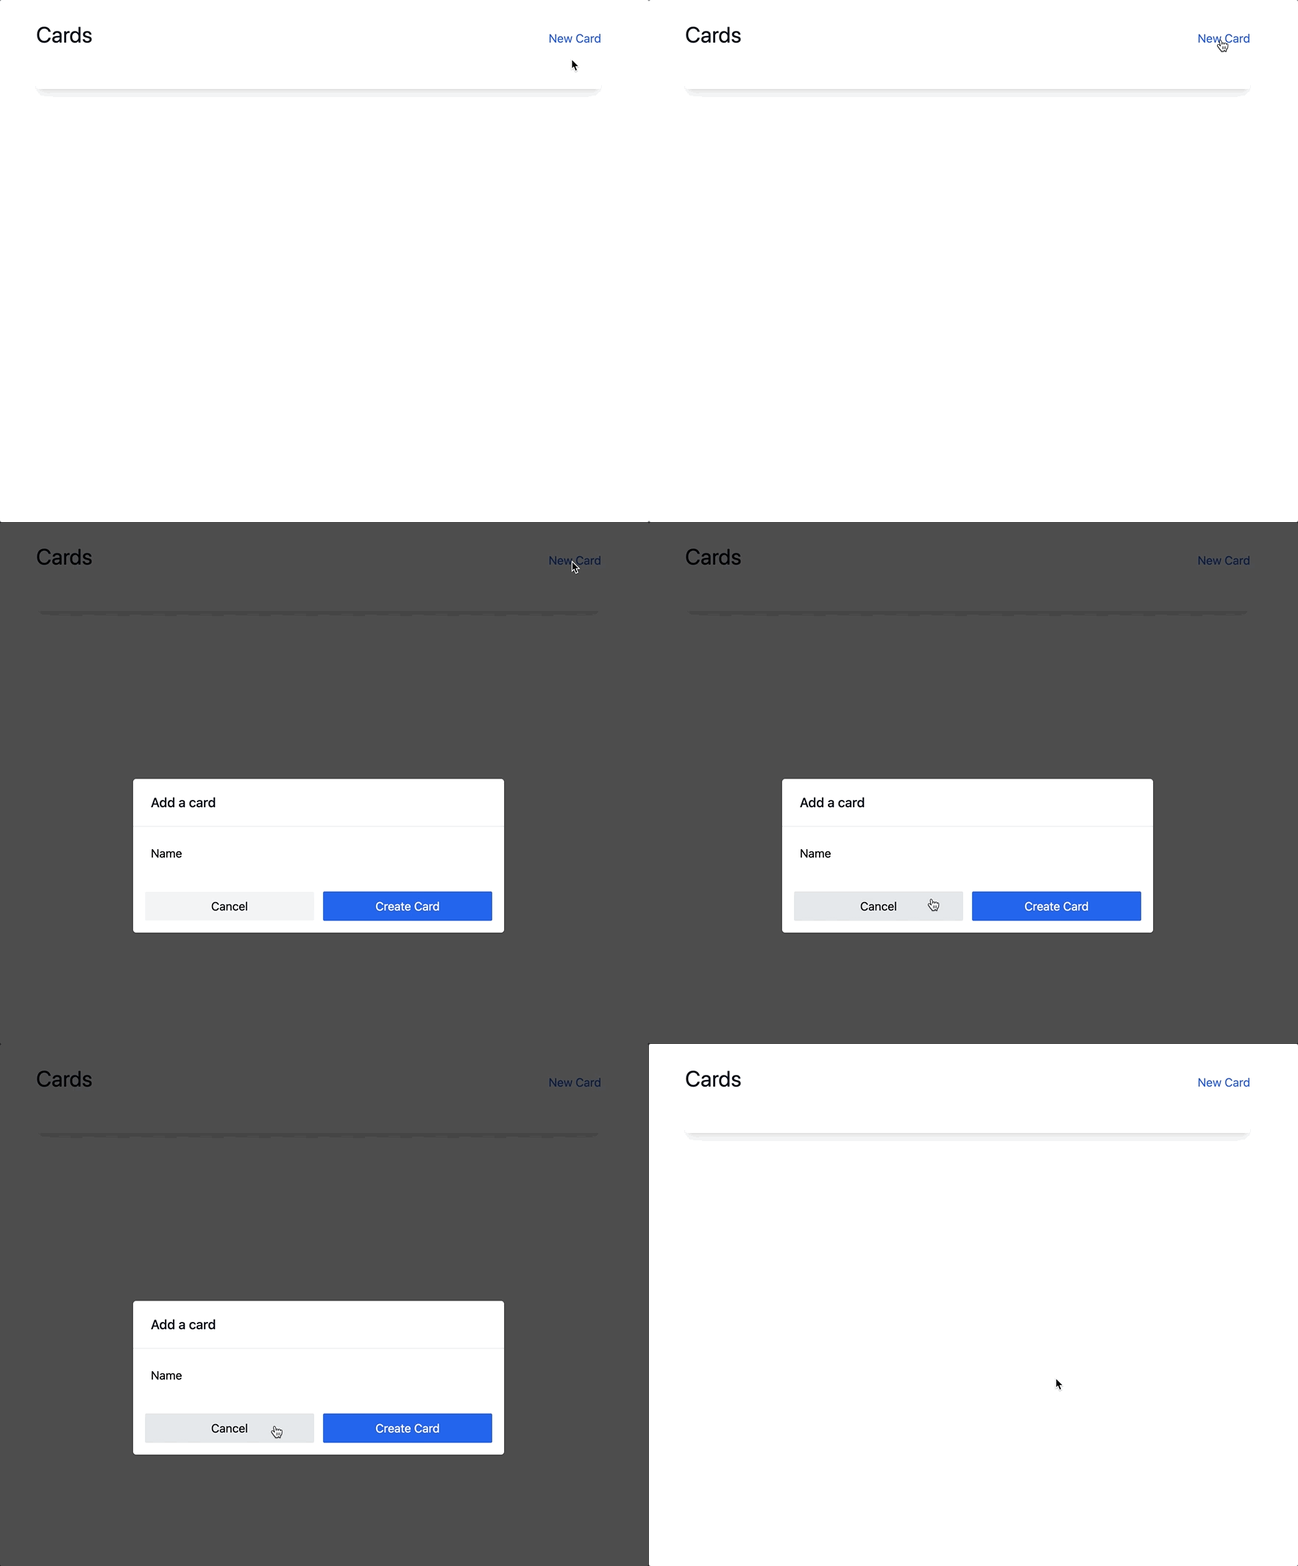
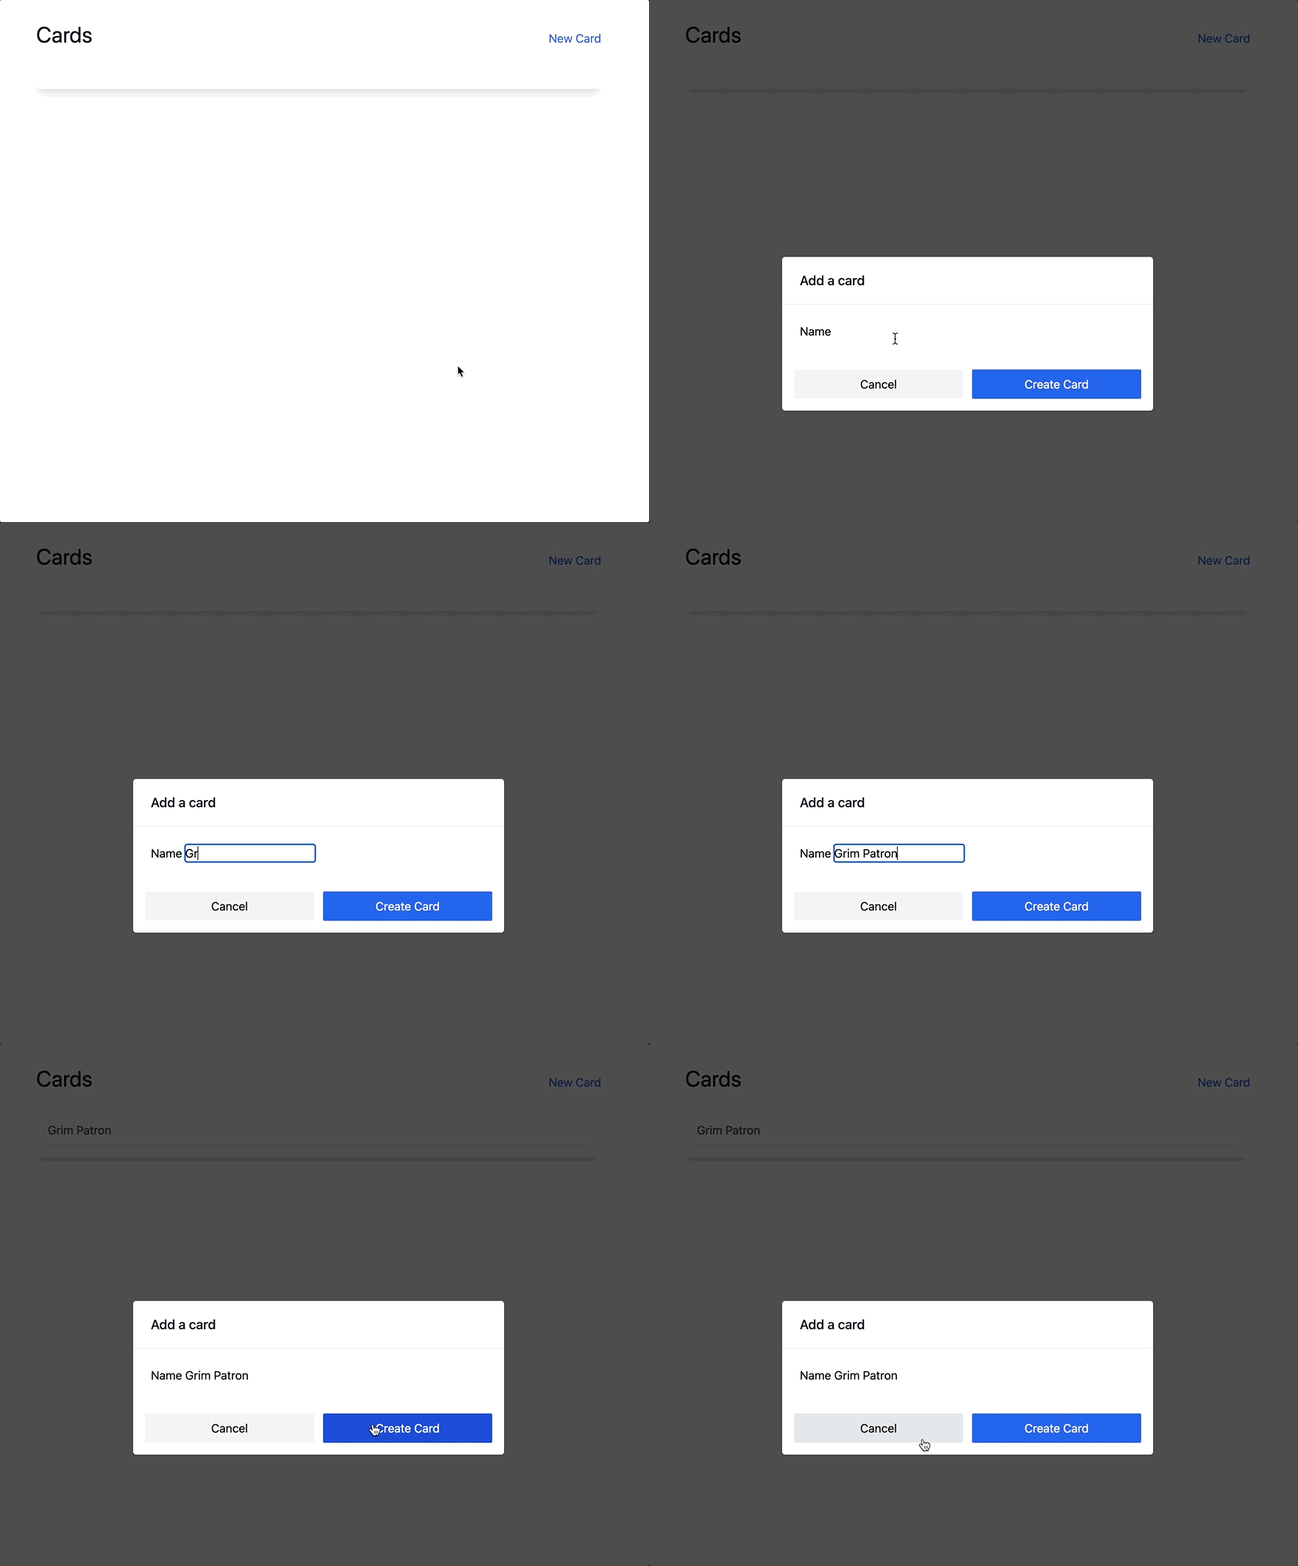
When we are finished our application work like this:

To follow along with this article, you will need to be comfortable with Ruby on Rails and you should have some experience using Stimulus. We will move quickly through the Turbo content, so previous exposure to using Turbo Streams will be helpful but is not required. As usual, you can review the complete code for this tutorial on Github.
Let’s get started!
Application setup
We will start with a new Rails 7 application with esbuild and Tailwind along with Turbo 7.2 and Stimulus. From your terminal:
rails new turbo-stream-modals --javascript=esbuild --css=tailwind
cd turbo-stream-modalsNote that neither Tailwind or esbuild are hard requirements, just personal preferences. The Turbo Stream and Stimulus techniques will work fine here with import maps, Vite, and any CSS framework you like.
For this exercise, users will be creating “cards”, which we will scaffold up using the Rails generator. From your terminal again:
rails g scaffold Card name:string
rails db:migrateStart up the server with bin/dev from your terminal.
Open the code up in your favorite editor and head to app/views/cards/index.html.erb for some non-essential layout updates:
<div class="max-w-3xl mx-auto mt-8">
  <div class="flex justify-between items-baseline mb-6">
    <h1 class="text-3xl text-gray-900">Cards</h1>
    <%= link_to 'New Card', new_card_path, class: "text-blue-600" %>
  </div>
  <div id="card-list" class="flex flex-col items-baseline space-y-6 p-4 shadow-lg rounded">
    <% @cards.each do |card| %>
      <%= render "card", card: card %>
    <% end %>
  </div>
</div>More small layout updates in app/views/cards/_card.html.erb:
<div class="text-gray-700 border-b border-gray-200 w-full pb-2">
  <%= card.name %>
</div>With cards scaffolded up and the views cleaned up a bit, we are ready to start building the modal.
Adding new cards in a modal
To open and close the card form modal, we are going to use a Stimulus controller.
Generate that controller from your terminal:
rails g stimulus modalFill that new Stimulus controller in at app/javascript/controllers/modal_controller.js:
// This controller is an edited-to-the-essentials version of the modal component created by @excid3 as part of the essential tailwind-stimulus-components package found here:
// https://github.com/excid3/tailwindcss-stimulus-components

import { Controller } from "@hotwired/stimulus"

export default class extends Controller {
static targets = ['container'];

  connect() {
    this.toggleClass = 'hidden';
    this.backgroundId = 'modal-background';
    this.backgroundHtml = this._backgroundHTML();
  }

  disconnect() {
    this.close();
  }

  open() {
    document.body.classList.add('fixed', 'inset-x-0', 'overflow-hidden');
    this.containerTarget.classList.remove(this.toggleClass);
    document.body.insertAdjacentHTML('beforeend', this.backgroundHtml);
    this.background = document.querySelector(`#${this.backgroundId}`);
  }

  close() {
    if (typeof event !== 'undefined') {
      event.preventDefault()
    }
    this.containerTarget.classList.add(this.toggleClass);
    if (this.background) { this.background.remove() }
  }

  _backgroundHTML() {
    return `<div id="${this.backgroundId}" class="fixed top-0 left-0 w-full h-full" style="background-color: rgba(0, 0, 0, 0.7); z-index: 9998;"></div>`;
  }
}As the comment notes, this code is a stripped-down version of the production-ready modal provided in Chris Oliver’s tailwindcss-stimulus-components library. I modified it to remove the extras that we don’t need for our project and to save us a few chunks of copy/pasted code that we would need if we were using the full library.
The JavaScript in this controller is fairly standard stuff, open opens the modal and close, shockingly, closes the modal by applying the right Tailwind classes and toggling in and out a background overlay.
To use this new Stimulus controller, we need to connect it to the DOM. Head over to app/views/layouts/application.html.erb:
<!DOCTYPE html>
<html>
  <head>
    <title>TurboStreamModals</title>
    <meta name="viewport" content="width=device-width,initial-scale=1">
    <%= csrf_meta_tags %>
    <%= csp_meta_tag %>

    <%= stylesheet_link_tag "application", "data-turbo-track": "reload" %>
    <%= javascript_include_tag "application", "data-turbo-track": "reload", defer: true %>
  </head>

  <body data-controller="modal">
    <%= yield %>
    <%= render "shared/modal" %>
  </body>
</html>Here, we connected the modal controller to the body. Inside of the body, we render a modal partial that does not exist yet.
Create that partial next, from your terminal:
mkdir app/views/shared
touch app/views/shared/_modal.html.erbFill in the modal partial:
<div data-modal-target="container"
     class="hidden fixed inset-0 overflow-y-auto flex items-center justify-center"
     style="z-index: 9999;">
  <div class="max-w-lg max-h-screen w-full relative">
    <div class="m-1 bg-white rounded shadow">
      <div class="px-4 py-5 border-b border-gray-200 sm:px-6">
        <h3 id="modal-title" class="text-lg leading-6 font-medium text-gray-900"></h3>
      </div>
      <div id="modal-body"></div>
    </div>
  </div>
</div>The key pieces in this partial are:
- The
modal-targetdata attribute on the container div. The Stimulus controller uses this attribute to know which element to apply classes to when the modal is opened and closed. - The
modal-titleheader and themodal-bodydiv, both of which are empty when the modal partial is rendered.
The empty modal-title and modal-body elements will be filled in with content from the server when we open the modal using the magic of Turbo Streams.
Next update app/views/cards/index.html.erb to adjust the New Card link to open a modal when clicked:
<div class="max-w-3xl mx-auto mt-8">
  <div class="flex justify-between items-baseline mb-6">
    <h1 class="text-3xl text-gray-900">Cards</h1>
    <%= link_to 'New Card', new_card_path, class: "text-blue-600", data: { action: "click->modal#open", turbo_stream: "" } %>
  </div>
  <div class="flex flex-col items-baseline space-y-6 p-4 shadow-lg rounded">
    <% @cards.each do |card| %>
      <%= render "card", card: card %>
    <% end %>
  </div>
</div>Note the addition here of two data attributes on the “New Card” link_to. The data-action attribute tells Stimulus to fire the modal#open method in the modal controller, making the modal visible to the user. The other attribute, data-turbo-stream tells Turbo to send the request to the server as a Turbo Stream request, instead of a standard HTML request.
data-turbo-streams is new in Turbo 7.2. This addition opens up the ability to respond to GET requests with Turbo Stream actions directly, instead of trojan horsing actions inside of empty Turbo Frames. This change allows us to write a little less code which is nice. Even better, it makes our intentions as developers more clear. The empty Turbo Frame work around was a confusing piece of indirection that we no longer need to rely on.
With the data-turbo-stream attribute added, Turbo will expect a Turbo Stream response from the server when the new card link is processed. To make this work, we need to tell Rails what we want to render in response to a Turbo Stream request to cards/new.
From your terminal:
touch app/views/cards/new.turbo_stream.erbFill in the new view:
<%= turbo_stream.update "modal-title", "Add a card" %>
<%= turbo_stream.update "modal-body", partial: "form", locals: { card: @card } %>Here our “view” is really two Turbo Stream actions. These actions will be picked up by Turbo’s JavaScript on the frontend and processed to update the DOM.
In this case, that means we will send over content for the empty header with an id of modal-title and the empty modal-body div. Turbo makes those updates, and our modal magically gets the updated, server-rendered content.
Update the cards form partial at app/views/cards/_form.html.erb before checking to see if our modal works:
<%= form_with(model: @card, id: "card-form") do |form| %>
  <div class="px-4 pt-5 pb-4 sm:p-6 sm:pb-4">
    <% if @card.errors.any? %>
      <div class="p-4 border border-red-600">
        <ul>
          <% @card.errors.full_messages.each do |message| %>
            <li><%= message %></li>
          <% end %>
        </ul>
      </div>
    <% end %>

    <div class="form-group">
      <%= form.label :name %>
      <%= form.text_field :name %>
    </div>

  </div>
  <div class="rounded-b mt-6 px-4 sm:grid sm:grid-cols-2 sm:gap-3 sm:grid-flow-row-dense">
    <%= form.button class: "w-full sm:col-start-2 bg-blue-600 px-4 py-2 mb-4 text-white rounded-sm hover:bg-blue-700" %>
    <button data-action="click->modal#close" class="mt-3 w-full sm:mt-0 sm:col-start-1 mb-4 bg-gray-100 hover:bg-gray-200 rounded-sm px-4 py-2">
      Cancel
    </button>
  </div>
<% end %>Refresh the cards index page at http://localhost:3000/cards, click on the “New Card” link and, if all has gone well so far, a modal should open with the new card header text and the card form populated.

At this point submitting the card form will create a new card in the database but, after saving the card you will be redirected to the card show page. Redirecting defeats the purpose of opening the card form in the modal. Let’s fix this issue next.
First, create another Turbo Stream view. From your terminal:
touch app/views/cards/create.turbo_stream.erbAnd fill that view in:
<%= turbo_stream.prepend "card-list", @card %>Easy enough. We use a Turbo Stream prepend action to insert the newly created card in the list.
Head over to app/controllers/cards_controller.rb and update the create method:
def create
  @card = Card.new(card_params)

  respond_to do |format|
    if @card.save
      format.html { redirect_to card_url(@card), notice: "Card was successfully created." }
      format.json { render :show, status: :created, location: @card }
      format.turbo_stream
    else
      format.html { render :new, status: :unprocessable_entity }
      format.json { render json: @card.errors, status: :unprocessable_entity }
    end
  end
endThe addition of format.turbo_stream when a card saves ensures that inbound Turbo Stream requests render the create.turbo_stream.erb view that we added.
By default, Turbo assumes all form submissions are Turbo Stream requests, so we don’t need to make any changes to our form for this to work, just having a Turbo Stream view is enough.
Head back to the cards index, open the modal and save a card. You’ll see the newly created card added to the top of the list of cards but the modal stays open.

Users will expect the modal to close when they submit the form, so let’s address that next.
Creating a custom Turbo Stream action
We are going to use a custom Turbo Stream action to dispatch an event when the card form is submitted successfully. This event will be generated on the server, sent over the wire to the frontend, processed by Turbo, and picked up by a waiting Stimulus controller to close the modal.
It’ll be pretty fancy. It will also be completely unnecessary. Turbo emits an event after a form submission that would work just fine to close our modal. Building a custom Turbo Stream action to submit an event is purely for demonstration purposes.
In the real world, if you need to close a modal after a Turbo Stream submission, the built-in event is just fine. It just isn’t as fun as rolling our own custom Turbo Stream action with the new tools provided for us in Turbo 7.2.
To implement the custom action we need a new helper on the Rails side and a little bit of JavaScript to tell Turbo what to do when it receives our custom action in the browser. Let’s start with the JavaScript.
From your terminal, create a new directory and file where we will define our custom event:
mkdir app/javascript/custom_actions
touch app/javascript/custom_actions/dispatch_event.jsFill in dispatch_event.js:
import { StreamActions } from '@hotwired/turbo'

StreamActions.dispatch_event = function() {
  const name = this.getAttribute('name')
  const event = new Event(name)
  window.dispatchEvent(event)
  // If you want to send the event somewhere besides the window
  // document.getElementById(this.target).dispatchEvent(event)
}Here, we are importing StreamActions from Turbo and extending it to add a new dispatch_event action to StreamActions.
dispatch_event takes a name attribute that we then use to define and dispatch an Event on the window.
While dispatching the event on the window works fine for this tutorial, in the real world, you can scope the event to a particular element instead of blasting it out on the window. I’ve noted a simple approach to that problem as a comment.
You might also want to define a new CustomEvent instead of an Event. Using a CustomEvent allows you to include additional data in the event payload. Again, we don’t need that extra data in this tutorial, but the possibility is there as you explore.
Head over to app/javascript/application.js to import the new custom action:
import "@hotwired/turbo-rails"
import "./controllers"
import "./custom_actions/dispatch_event"That’s the JavaScript-side completed.
Next we need to define a matching Turbo Stream helper tag on the server. From your terminal:
touch app/helpers/dispatch_event_helper.rbAnd fill in the new dispatch_event_helper file:
module DispatchEventHelper
  def dispatch_event(name)
    turbo_stream_action_tag :dispatch_event, name: name
  end
end

Turbo::Streams::TagBuilder.prepend(DispatchEventHelper)Nothing fancy. We add a new dispatch_event helper and add it to the list of available Turbo Stream action tags.
Both the JavaScript and Rails side of the equation here are derived from Marco Roth’s example in the PR that made these custom helper tags possible in turbo-rails. This work was instrumental in getting full-featured support for custom Turbo Stream actions into our hands.
To use this new helper tag, update app/views/create.turbo_stream.erb:
<%= turbo_stream.prepend "card-list", @card %>
<%= turbo_stream.dispatch_event "modalClose" %>With this change, the Turbo Stream payload will now include both a prepend action and our custom dispatch_event action, which will emit an event on the client side named “modalClose”.
The last step to make this work is to fire the close method in the modal Stimulus controller when the modalClose event is received.
Back in app/views/application.html.erb:
<!DOCTYPE html>
<html>
  <head>
    <title>TurboStreamModals</title>
    <meta name="viewport" content="width=device-width,initial-scale=1">
    <%= csrf_meta_tags %>
    <%= csp_meta_tag %>

    <%= stylesheet_link_tag "application", "data-turbo-track": "reload" %>
    <%= javascript_include_tag "application", "data-turbo-track": "reload", defer: true %>
  </head>

  <body data-controller="modal" data-action="modalClose@window->modal#close">
    <%= yield %>
    <%= render "shared/modal" %>
  </body>
</html>Note the new data-action attribute on the body listening for the modalClose custom event.
Head back to the cards index page, open the modal, create a new card, and see that the new card is prepended to the list and the modal closes. Incredible stuff.

Let’s look closer at what is happening here by looking at the payload that the server sends over the wire when it renders create.turbo_stream.erb.
That payload will look something like this:
<turbo-stream action="prepend" target="card-list">
  <template>
    <div class="text-gray-700 border-b border-gray-200 w-full pb-2">
      Grim Patron
    </div>
  </template>
</turbo-stream>
<turbo-stream name="modalClose" action="dispatch_event">
  <template></template>
</turbo-stream>The payload contains turbo-stream custom elements with an action set. Each element wraps a template tag, although the template for our dispatch_event action is empty since that action does not need to render any HTML.
Turbo’s JavaScript processes the payload. The custom action we defined in app/javascript/custom_actions/dispatch_event.js is used to process the dispatch_event action in the payload.
This technique is incredibly powerful and opens the door for Turbo users to begin to experiment with more complex DOM manipulation in Turbo Stream actions. Our example dispatches an event but we could just as easily play a sound, morph in new content with morphdom, manipulate data attributes, or add or remove CSS classes by defining new custom Turbo Stream actions.
As you experiment with your own custom actions, you’ll find the Turbo source helpful for understanding how the existing Turbo Stream actions are implemented, and the turbo-rails source helpful for learning how to build new action helpers.
Let’s finish up this article by handling invalid form submissions with Turbo Streams.
First, update the create method in app/controllers/cards_controller.rb:
def create
  @card = Card.new(card_params)

  respond_to do |format|
    if @card.save
      format.html { redirect_to card_url(@card), notice: "Card was successfully created." }
      format.json { render :show, status: :created, location: @card }
      format.turbo_stream
    else
      format.html { render :new, status: :unprocessable_entity }
      format.json { render json: @card.errors, status: :unprocessable_entity }
      format.turbo_stream { render turbo_stream: turbo_stream.replace('card-form', partial: 'form'), status: :unprocessable_entity }
    end
  end
endHere, we updated the unhappy path to render an inline turbo_stream.replace action. When the card isn’t saved, we re-render the form and replace it inline, leaving the modal open with the errors displayed to the user.
Before we can test this, we need to add validation to the card model. Update app/models/card.rb like this:
class Card < ApplicationRecord
  validates_presence_of :name
endOpen the card modal and submit the form with a blank name input. See that the modal stays open with the errors rendered on the form. Beautiful.
Great work making it to the end of this tutorial — I hope it has helped to see the changes in Turbo 7.2 in action, and I hope it gets the wheels turning on what you can do with custom Turbo Stream actions.
Wrapping up
Today we built a modal form with Rails, Turbo, and Stimulus, using a Turbo Stream GET request and a custom Turbo Stream action, both of which are new tools unlocked by the release of Turbo 7.2.
Our implementation of a modal has some room to grow. If you want to stretch these muscles a bit, try adding functionality to clear the modal content each time it closes. Without clearing the content on close, the user will see a brief flash of old content each time the modal is opened. To implement this, you might consider emptying the modal-title and modal-body elements each time close is called in the Stimulus controller. Adding the ability to edit existing cards in the same modal would also be a useful exercise.
If the world of highly targeted DOM manipulation initiated from the server is new to you, you might find inspiration in CableReady. CableReady provides 30+ operations out of the box, everything from simple HTML replacement to adding CSS classes, logging to the console, and dispatching events.
Custom Turbo Stream actions are a powerful tool, but if you find you need more, CableReady is the place to look.
That’s all for today — as always, thanks for reading!