Handling modal forms with Rails, Tailwind CSS, and Hotwire
15 Jul 2021September 2022 update: Since this article was written, Rails 7 and Turbo 7.2 have been released. There are new, simpler techniques to building modal forms with Turbo now. I published an updated version of this article after the release of Turbo 7.2, I recommend reading that article instead.
The release of the Hotwire package of Stimulus and Turbo has brought a tremendously powerful set of tools to Rails developers who want to bring the speed of a single page application to their users without sacrificing the development speed and happiness that Rails is known for.
Today we are using Hotwire, Rails, and Tailwind CSS to build a modal form submission flow.
With just a little bit of Stimulus and Turbo, we will create a user experience that opens a modal on click, retrieves modal content remotely, and cleanly handles successful form submission and form errors.
This modal flow will help us learn a few of the core concepts of Hotwire while demonstrating how to implement a very common user experience in modern web development.
The finished product will look something like this:
I am writing this guide assuming that you are comfortable with Ruby on Rails and that you have some level of familiarity with Stimulus. You do not need to be an expert on either.
While we use Tailwind CSS to make our modal implementation simple, you do not need experience with Tailwind. If you prefer, you can implement your own, non-Tailwind modal and still get value from this guide.
You can find the complete code for this project on Github.
Let’s get started.
Project setup
We are going to start with a fresh Rails 6.1 application. If you prefer, you can follow along in an existing Rails 6 application, just be sure you’ve got Hotwire and Tailwind 2 installed.
If you want to skip the setup steps and don’t have a repo handy, clone down this repository, bundle install, and you’re good to go. If you take this route, jump ahead to the setting up comments section below.
To start from scratch, first open your terminal and run these commands:
rails new hotwire_modals -T
cd hotwire_modals
bundle add hotwire-rails
rails hotwire:install
Next, we will setup Tailwind CSS.
In your terminal, run:
yarn add tailwindcss@latest postcss@latest autoprefixer@latest @tailwindcss/forms
npx tailwind init
Then update postcss.config.js:
module.exports = {
  plugins: [
    require("tailwindcss")("./tailwind.config.js"),
    require("postcss-import"),
    require("postcss-flexbugs-fixes"),
    require("postcss-preset-env")({
      autoprefixer: {
        flexbox: "no-2009",
      },
      stage: 3,
    }),
  ],
}
And update tailwind.config.js:
module.exports = {
  purge: [
    './app/**/*/*.html.erb',
    './app/helpers/**/*/*.rb',
    './app/javascript/**/*/*.js',
  ],
  darkMode: false, // or 'media' or 'class'
  theme: {
    extend: {},
  },
  variants: {
    extend: {},
  },
  plugins: [
    require('@tailwindcss/forms')
  ],
}
Next we’ll import Tailwind into the application. In your terminal run:
mkdir app/javascript/stylesheets
touch app/javascript/stylesheets/application.scss
And update the newly created application.scss file to import tailwind:
@import "tailwindcss/base";
@import "tailwindcss/components";
@import "tailwindcss/utilities";
Next, update your existing application.js file to import application.scss:
import Rails from "@rails/ujs"
import "@hotwired/turbo-rails"
import * as ActiveStorage from "@rails/activestorage"
import "channels"

// This is the line we're adding
import "stylesheets/application"

Rails.start()
ActiveStorage.start()

import "controllers"
That’s a lot of copy and pasting, hang in there. One more to go before we get to the fun stuff.
Update app/views/layouts/application.html.erb with the below:
<!DOCTYPE html>
<html>
  <head>
    <title>HotwireModals</title>
    <meta name="viewport" content="width=device-width,initial-scale=1">
    <%= csrf_meta_tags %>
    <%= csp_meta_tag %>

    <%= stylesheet_pack_tag 'application', media: 'all', 'data-turbolinks-track': 'reload' %>
    <%= javascript_pack_tag 'application', 'data-turbolinks-track': 'reload' %>
  </head>

  <body class="max-w-7xl mx-auto mt-8">
    <%= yield %>
  </body>
</html>
Perfect. Next we will scaffold up a Comment resource, which we’ll use to build our modal form submission flow.
Setting up comments
First, generate a Comment resource. In your terminal:
rails g scaffold Comment body:string
rails db:migrate
touch app/views/comments/_comment.html.erb
Then update the comments index view with a simple list view layout:
<!-- app/view/comments/index.html.erb -->
<div class="max-w-3xl mx-auto mt-8">
  <div class="flex justify-between items-baseline mb-6">
    <h1 class="text-3xl text-gray-900">Comments</h1>
    <%= link_to 'New Comment', new_comment_path, class: "text-blue-600" %>
  </div>
  <div class="flex flex-col items-baseline space-y-6 p-4 shadow-lg rounded">
    <% @comments.each do |comment| %>
      <%= render "comment", comment: comment %>
    <% end %>
  </div>
</div>
The index view loops through the comments and renders the _comment partial for each one. Let’s fill that in with the below:
<!-- app/view/comments/index.html.erb -->
<div class="text-gray-700 border-b border-gray-200 w-full pb-2">
  <%= comment.body %>
</div>
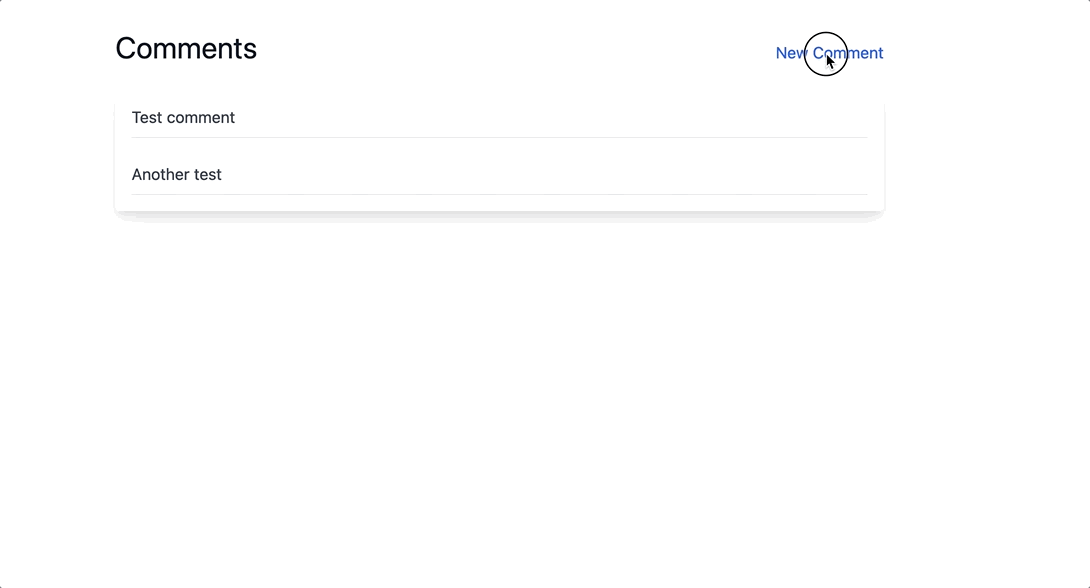
At this point, boot up your Rails server and head to http://localhost:3000/comments. You should see a layout that looks something like this.

Go ahead and create a few comments to test things out.
Once you confirm everything looks right, head on to the next section where we will add a modal to the replace the standalone New view that the scaffold generator provided.
Add Tailwind Stimulus Components
Rather than reinventing the wheel and writing a Stimulus controller to open and close our modal, we’re going to use Tailwind CSS Stimulus Components. This project provides easy-to-use, production-ready components for a variety of common front-end user interactions built with Stimulus and Tailwind, including a ready-to-use modal component.
One of the joys of Ruby on Rails development is the incredibly robust ecosystem of community-built libraries that help reduce the effort that goes in to building Rails applications.
While the Stimulus community is still growing, projects like Tailwind Stimulus Components are already making it easier to build Stimulus-powered frontend experiences.
First add tailwind-stimulus-components to your application. From your terminal:
yarn add tailwindcss-stimulus-components
Then import and register the Modal component in app/javascript/controllers/index.js:
import { Modal } from "tailwindcss-stimulus-components"
application.register('modal', Modal)
While we are going to use the basic behavior of the Modal component, for our purposes we’ll need to add a little bit of extra functionality to the modal controller. We can do this by extending the Modal controller.
First, in your terminal:
touch app/javascript/controllers/extended_modal_controller.js
Then update the newly created controller as shown below:
import { Modal } from "tailwindcss-stimulus-components"

export default class ExtendedModal extends Modal {
  static targets = ["form"]

  connect() {
    super.connect()
  }
}
Wire up the modal
With our ExtendedModal controller created, we are ready to start building our Hotwire-powered modal interface.
First, create a partial to hold the modal content. From your terminal:
touch app/views/comments/_modal.html.erb
And fill that partial in with the below:
<div data-extended-modal-target="container" class="hidden animated fadeIn fixed inset-0 overflow-y-auto flex items-center justify-center" style="z-index: 9999;">
  <div class="max-w-lg max-h-screen w-full relative">
    <div class="m-1 bg-white rounded shadow">
      <div class="px-4 py-5 border-b border-gray-200 sm:px-6">
        <h3 class="text-lg leading-6 font-medium text-gray-900">
          Comment
        </h3>
      </div>
      <form id="comment_form"></form>
    </div>
  </div>
</div>
This partial contains the body of the modal.
The style is mostly copied from the tailwind-stimulus-components documentation, the most important parts for our project are setting the data-extended-modal-target, which is required for the modal to open and the empty <form id="comment_form"> tag. This empty tag serves as a placeholder for the comments form content that will be populated when the modal opens.
Next up, we’ll update the comments index view to connect our modal controller to the DOM:
<!-- comments/index.html.erb -->

<%= turbo_frame_tag 'comment_modal' %>

<div class="max-w-3xl mx-auto mt-8">
  <div class="flex justify-between items-baseline mb-6" data-controller="extended-modal" data-extended-modal-prevent-default-action-opening="false">
    <%= render 'modal' %>
    <h1 class="text-3xl text-gray-900">Comments</h1>
    <%= link_to 'New Comment', new_comment_path, class: "text-blue-600", data: { action: "click->extended-modal#open", 'turbo-frame': 'comment_modal' } %>
  </div>
  <%= turbo_frame_tag "comments", class: "flex flex-col items-baseline space-y-6 p-4 shadow-lg rounded" do %>
    <% @comments.each do |comment| %>
      <%= render "comment", comment: comment %>
    <% end %>
  <% end %>
</div>
Now we are into the meat of the project. Let’s walk through what we changed here.
First, we render an empty <turbo_frame>. We’ll populate this frame with the content of the modal when the New Comment link is clicked.
Next, we connect our controller to the dom with data-controller="extended-modal" and override the default behavior of the modal controller with prevent-default-action-opening="false" which tells our modal controller to allow the link_to action to run as normal.
The New Comment link_to which has two data attributes. The first is a standard Stimulus action attribute which fires the open function of our modal controller on click.
The second is a Turbo attribute which tells Turbo to render the response from the server in the comment_modal <turbo_frame> that we added at the top of the view. Without this data attribute, Turbo would not know where to place the response from comments/new and clicking on the New Comment link would just render an empty modal.
The basic flow of our modal is this:
- User clicks on New Comment link
- The click fires the extended-modal#open function which opens the modal
- Because we told the open function to allow the default action to be followed, a request is sent to comments/new
- When a response is received from comments/new, Turbo steps in and attempts to insert the response into the comment_modal turbo frame
Finally, we replace our comments wrapper div with a “comments” turbo_frame_tag. We will use this frame later to insert new comments after a successful form submission.
Fancy stuff, but we’re not quite there yet.
Next we need to update the new comments view and the comment form partial in order for the modal to properly render the comment form after it opens.
Let’s start with updating the new view:
<!-- comments/new.html.erb -->

<%= turbo_frame_tag 'comment_modal' do %>
  <turbo-stream target="comment_form" action="replace">
    <template>
      <%= render partial: "form", locals: { comment: @comment } %>
    </template>
  </turbo-stream>
<% end %>
Here we’re rendering a comment_modal turbo_frame tag and inside of that rendering a turbo-stream that looks for an element with an id of comment_form and replaces it.
Next, the form partial:
<%= form_with(model: @comment, id: "comment_form", data: { extended_modal_target: 'form' }) do |form| %>
  <div class="px-4 pt-5 pb-4 sm:p-6 sm:pb-4">
    <% if @comment.errors.any? %>
      <div class="p-4 border border-red-600">
        <ul>
          <% @comment.errors.full_messages.each do |message| %>
            <li><%= message %></li>
          <% end %>
        </ul>
      </div>
    <% end %>

    <div class="form-group">
      <%= form.label :body %>
      <%= form.text_field :body %>
    </div>

  </div>
  <div class="rounded-b mt-6 px-4 sm:grid sm:grid-cols-2 sm:gap-3 sm:grid-flow-row-dense">
    <%= form.button class: "w-full sm:col-start-2 bg-blue-600 px-4 py-2 mb-4 text-white rounded-sm hover:bg-blue-700" %>
    <button data-action="click->extended-modal#close" class="mt-3 w-full sm:mt-0 sm:col-start-1 mb-4 bg-gray-100 hover:bg-gray-200 rounded-sm px-4 py-2">
      Cancel
    </button>
  </div>
<% end %>
The form is almost entirely standard Rails form_with content. The important bits are passed in to the form_with. First we set the id of the form to comment_form. Recall that the turbo-stream in comments/new is looking for an element with that id.
Next, we add a data-extended-modal-target attribute of “form”. We will use this target attribute later to reset the form after a successful submission.
With those views in place, let’s update the comments controller to send turbo_stream responses when the posts#create action is called:
# app/controllers/comments_controller.rb
# Snipped content
def create
  @comment = Comment.new(comment_params)

  if @comment.save
    render turbo_stream: turbo_stream.append(
      'comments',
      partial: 'comment',
      locals: {
        comment: @comment
      }
    )
  else
  # TODO: Handle errors
  end
end
# Snipped content
Here’s where the turbo_stream magic happens.
When our comment form is submitted, the create action is called and, if the comment saves, the server sends a turbo_stream response that appends the comment partial to a comments turbo_frame. Note that we do not need a comments.turbo_stream.erb partial, the existing html comments partial we have gets used automatically.
The final step to properly handling our form submission is to close the modal after the form is submitted successfully. To do this, we will add a small function to the modal Stimulus controller and then attach an event listener to the DOM.
First, add this function to app/javascript/controllers/extended_modal_controller.js
handleSuccess({ detail: { success } }) {
  if (success) {
    super.close()
    this.formTarget.reset()
  }
}
handleSuccess simply checks a boolean success value and, if success is true, we close the modal and reset the form. If success is false (meaning the form submission failed), our Stimulus controller does nothing.
Finally, to ensure handleSuccess is called after the form is submitted, update the modal partial as shown:
<div data-extended-modal-target="container"
     data-action="turbo:submit-end->extended-modal#handleSuccess"
     class="hidden animated fadeIn fixed inset-0 overflow-y-auto flex items-center justify-center"
     style="z-index: 9999;">
<!-- Snip inner content -->
</div>
Here we’ve added a data-action attribute listening for the turbo:submit-end event. When that event fires, our modal controller’s handleSuccess function is called, allowing our modal to close when the form is submitted successfully.
Whew. At this point, if you’ve been following along with each step, you should be able to load up the comments index page, click the New Comment link, type in a comment and submit it successfully. If everything is working, the new comment link will open a modal, and submitting the modal’s form will close the modal and append the new comment onto the comment list.
Handling form errors
To wrap up, we’ll update our CommentsController to handle errors. This’ll be quick.
First, update the comments model to validate that body is present so that it is possible to have an invalid comment submission.
class Comment < ApplicationRecord
  validates_presence_of :body
end
Then head to the CommentsController and update the create method as shown:
def create
  @comment = Comment.new(comment_params)

  if @comment.save
    render turbo_stream: turbo_stream.append(
      'comments',
      partial: 'comment',
      locals: {
        comment: @comment
      }
    )
  else
    render turbo_stream: turbo_stream.replace(
      'comment_form',
      partial: 'form',
      locals: {
        comment: @comment
      }
    ), status: :unprocessable_entity
  end
end
In the else block, we’re again rendering a turbo_stream response. This time, we target the comment_form turbo_frame and replace the content of frame instead of appending. We also send along a 422 status code so that the turbo:submit-end properly sets success to false. Otherwise, the default status code of 200 would cause our modal to close.
With this error handling in place, submitting the modal form without typing anything into the body field will cause the form to rerender with the errors listed above the form, like this:
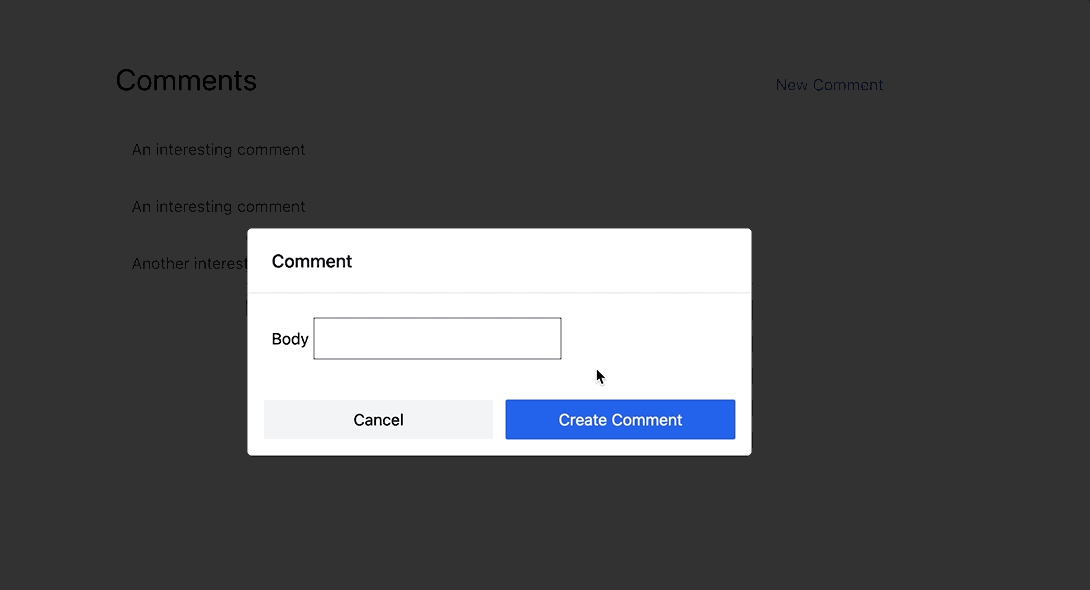
As our very last step, thanks to Turbo’s caching, an edge-case UI error can happen now that we have error handling in place.
If a user attempts to submit the form with a blank body, and then corrects their error and successfully submits the form, clicking the New Comment link again will open the form with the error section still present on the modal.
We can clear that up with a small addition to our modal Stimulus controller:
import { Modal } from "tailwindcss-stimulus-components"

export default class ExtendedModal extends Modal {
  static targets = ["form", "errors"]

  connect() {
    super.connect()
  }

  handleSuccess({ detail: { success } }) {
    if (success) {
      super.close()
      this.clearErrors()
      this.formTarget.reset()
    }
  }

  clearErrors() {
    if (this.hasErrorsTarget) {
      this.errorsTarget.remove()
    }
  }
}
Here the clearErrors function looks for the presence of errors on the form and removes them from the DOM if they exist. To make this work, update the form partial to add the data-extended-modal-target onto the errors container:
<!-- app/views/comments/_form.html.erb -->
<% if @comment.errors.any? %>
  <div class="p-4 border border-red-600" data-extended-modal-target="errors">
    <h2>
      Could not save comment
    </h2>
    <ul>
      <% @comment.errors.full_messages.each do |message| %>
        <li><%= message %></li>
      <% end %>
    </ul>
  </div>
<% end %>
Wrapping up
That’s all for today. I hope that this guide has helped you see some of the power you can unlock by adding Hotwire to your Rails stack.
With Hotwire, we were able to build a modal-based form submission flow that eliminates full page turns and delivers a modern-feeling, performant solution while still keeping our code easy to follow and build upon for any Rails developer.
Hotwire is still new, and still evolving rapidly, in the future we can expect even more powerful functionality and even tighter integration with Rails as the community continues to add Hotwire to new and existing Rails applications.
Here are a few resources I used as I wrote this guide:
- Tailwind Stimulus Components: In addition to modals, this project gives you ready-to-use Alerts, Dropdowns, and Tabs, among other things. Before you roll your own component, check here.
- How to use modals with forms in Rails using Turbo: This article served as a great starting point for my work and helped me reach the solution that I presented. Highly recommended if you’re interested in another approach to handling modal forms with Turbo
- The Turbo and Stimulus handbooks
- The Turbo source code: Turbo is evolving rapidly enough that even the official documentation can sometimes lag behind. Reading through the source can be a great way to learn more about the options you have for solving a problem, and for understanding what’s going on behind the scenes.
Thanks for reading!
About the author:
I’m David - a solo founder and consultant. I write about software engineering, Ruby on Rails and the Rails-y ecosystem, product management, and the lessons I learn as I work to build sustainable SaaS businesses.
My current project is Vestimonials, an async video communication tool to help companies collect and share video testimonials from their employees and customers.
I’m available for Rails, product management, and strategy consulting. Get in touch if you have questions about this article or anything else that’s on your mind.